نوشته شده توسط : Likaibin


Autel G-BOX2 is update version of Autel G-BOX which is used to do Mercedes Benz All Key Lost work with Autel MaxiIM IM608 and Autel IM508 with XP400.

Autel-G-BOX2-is-update-version-of-Autel-G-BOX-1
Autel G-BOX2 Features:

1. Support fast mode on Vehicle and bench when all keys of Mercedes-Benz vehicles using the Das3 EIS/ EZS are lost
2. Read and write Bosch Engine ECU on F Classis of BMW and MQB of Volkswagen
3. With the Autel’s advanced Diagnostic Tablets supporting IMMO and Key programming functions

Autel-G-BOX2-is-update-version-of-Autel-G-BOX-2

Two Method to do Mercedes-Benz All Key Lost with Autel G-Box2:

Via OBD:
This method is suitable for Mercedes-Benz W204, W207, W216 and W164 EISs after the year 2009.

Autel-G-BOX2-is-update-version-of-Autel-G-BOX-3

On Bench:
This Method is suitable for all Mercedes-Benz EISs that are already supported by Autel Diagnostic Tablet

Autel-G-BOX2-is-update-version-of-Autel-G-BOX-4

Autel G-BOX2 Connection:

1. Plug the G-Box2 to the Mercedes-Benz EIS using the packed DB15 Cable
2. Plug to the DC port of G-Box2 using a power adapter (DV 12V)
3. Plug the G-Box2 to the Autel Diagnostic Tablet


:: بازدید از این مطلب : 102
|
امتیاز مطلب : 0
|
تعداد امتیازدهندگان : 0
|
مجموع امتیاز : 0
تاریخ انتشار : شنبه 27 دی 1399 | نظرات ()
نوشته شده توسط : Likaibin

Here share a problem and solution about 2TB Hard Drive with all VXDIAG software cannot be installed on PC for VXDIAG VCX SE Benz DOIP.

Customer Problem:

I want to install all VXDIAG software HD on my Panasonic CF-19, but when I follow the prompt to select Mercedes-Benz operating system to start, I receive the error report “Windows failed to start. A recent hardware or software change might be the cause…” as shown in the pictures below.

vcx-se-benz-with-all-vxdiag-software-install-error-solution-1 (2)

vcx-se-benz-with-all-vxdiag-software-install-error-solution-2 (2)

Obd2tool.com engineer replied:

Please try to solve it by the following step-by-step operation.

Step 1: Press and release the power button to start the computer

Step 2: Press the blue ThinkVantage button [F12]

vcx-se-benz-with-all-vxdiag-software-install-error-solution-3 (2)

Step 3: Select [USB HDD] and press [Enter] button

vcx-se-benz-with-all-vxdiag-software-install-error-solution-4 (2)

Step 4: Select [Boot Win10x 64PE (2G above)]

vcx-se-benz-with-all-vxdiag-software-install-error-solution-5 (2)

Step 5: Open [BootFix] software

Select the BIOS (MBR Disk Boot Partition) and click “Yes”

vcx-se-benz-with-all-vxdiag-software-install-error-solution-6 (2)

Step 6: When repair successfully, it will show a success message.

vcx-se-benz-with-all-vxdiag-software-install-error-solution-7 (2)

If you have any VXDIAG VCX SE problem, please feel free to contact us.


:: برچسب‌ها: VXDIAG VCX SE Benz DOIP ,
:: بازدید از این مطلب : 109
|
امتیاز مطلب : 0
|
تعداد امتیازدهندگان : 0
|
مجموع امتیاز : 0
تاریخ انتشار : شنبه 27 دی 1399 | نظرات ()
نوشته شده توسط : Likaibin

Here share a problem and solution about 2TB Hard Drive with all VXDIAG software cannot be installed on PC for VXDIAG VCX SE Benz DOIP.

Customer Problem:

I want to install all VXDIAG software HD on my Panasonic CF-19, but when I follow the prompt to select Mercedes-Benz operating system to start, I receive the error report “Windows failed to start. A recent hardware or software change might be the cause…” as shown in the pictures below.

vcx-se-benz-with-all-vxdiag-software-install-error-solution-1 (2)

vcx-se-benz-with-all-vxdiag-software-install-error-solution-2 (2)

Obd2tool.com engineer replied:

Please try to solve it by the following step-by-step operation.

Step 1: Press and release the power button to start the computer

Step 2: Press the blue ThinkVantage button [F12]

vcx-se-benz-with-all-vxdiag-software-install-error-solution-3 (2)

Step 3: Select [USB HDD] and press [Enter] button

vcx-se-benz-with-all-vxdiag-software-install-error-solution-4 (2)

Step 4: Select [Boot Win10x 64PE (2G above)]

vcx-se-benz-with-all-vxdiag-software-install-error-solution-5 (2)

Step 5: Open [BootFix] software

Select the BIOS (MBR Disk Boot Partition) and click “Yes”

vcx-se-benz-with-all-vxdiag-software-install-error-solution-6 (2)

Step 6: When repair successfully, it will show a success message.

vcx-se-benz-with-all-vxdiag-software-install-error-solution-7 (2)

If you have any VXDIAG VCX SE problem, please feel free to contact us.


:: برچسب‌ها: VXDIAG VCX SE Benz DOIP ,
:: بازدید از این مطلب : 100
|
امتیاز مطلب : 0
|
تعداد امتیازدهندگان : 0
|
مجموع امتیاز : 0
تاریخ انتشار : شنبه 27 دی 1399 | نظرات ()
نوشته شده توسط : Likaibin


Autel G-BOX2 is update version of Autel G-BOX which is used to do Mercedes Benz All Key Lost work with Autel MaxiIM IM608 and Autel IM508 with XP400.

Autel-G-BOX2-is-update-version-of-Autel-G-BOX-1
Autel G-BOX2 Features:

1. Support fast mode on Vehicle and bench when all keys of Mercedes-Benz vehicles using the Das3 EIS/ EZS are lost
2. Read and write Bosch Engine ECU on F Classis of BMW and MQB of Volkswagen
3. With the Autel’s advanced Diagnostic Tablets supporting IMMO and Key programming functions

Autel-G-BOX2-is-update-version-of-Autel-G-BOX-2

Two Method to do Mercedes-Benz All Key Lost with Autel G-Box2:

Via OBD:
This method is suitable for Mercedes-Benz W204, W207, W216 and W164 EISs after the year 2009.


:: برچسب‌ها: Autel G-Box2 ,
:: بازدید از این مطلب : 102
|
امتیاز مطلب : 0
|
تعداد امتیازدهندگان : 0
|
مجموع امتیاز : 0
تاریخ انتشار : چهار شنبه 17 دی 1399 | نظرات ()
نوشته شده توسط : Likaibin

Here share a problem and solution about 2TB Hard Drive with all VXDIAG software cannot be installed on PC for VXDIAG VCX SE Benz DOIP.

Customer Problem:

I want to install all VXDIAG software HD on my Panasonic CF-19, but when I follow the prompt to select Mercedes-Benz operating system to start, I receive the error report “Windows failed to start. A recent hardware or software change might be the cause…” as shown in the pictures below.

vcx-se-benz-with-all-vxdiag-software-install-error-solution-1 (2)

vcx-se-benz-with-all-vxdiag-software-install-error-solution-2 (2)

Obd2tool.com engineer replied:

Please try to solve it by the following step-by-step operation.

Step 1: Press and release the power button to start the computer

Step 2: Press the blue ThinkVantage button [F12]

vcx-se-benz-with-all-vxdiag-software-install-error-solution-3 (2)

Step 3: Select [USB HDD] and press [Enter] button

vcx-se-benz-with-all-vxdiag-software-install-error-solution-4 (2)

Step 4: Select [Boot Win10x 64PE (2G above)]

vcx-se-benz-with-all-vxdiag-software-install-error-solution-5 (2)

Step 5: Open [BootFix] software

Select the BIOS (MBR Disk Boot Partition) and click “Yes”

vcx-se-benz-with-all-vxdiag-software-install-error-solution-6 (2)

Step 6: When repair successfully, it will show a success message.

vcx-se-benz-with-all-vxdiag-software-install-error-solution-7 (2)

If you have any VXDIAG VCX SE problem, please feel free to contact us.


http://avdicommander.com/2020/12/21/vcx-se-benz-with-all-vxdiag-software-installation-error-solution/


:: برچسب‌ها: VXDIAG VCX SE ,
:: بازدید از این مطلب : 92
|
امتیاز مطلب : 0
|
تعداد امتیازدهندگان : 0
|
مجموع امتیاز : 0
تاریخ انتشار : چهار شنبه 17 دی 1399 | نظرات ()
نوشته شده توسط : Likaibin

Here share a problem and solution about 2TB Hard Drive with all VXDIAG software cannot be installed on PC for VXDIAG VCX SE Benz DOIP.

Customer Problem:

I want to install all VXDIAG software HD on my Panasonic CF-19, but when I follow the prompt to select Mercedes-Benz operating system to start, I receive the error report “Windows failed to start. A recent hardware or software change might be the cause…” as shown in the pictures below.

vcx-se-benz-with-all-vxdiag-software-install-error-solution-1 (2)

vcx-se-benz-with-all-vxdiag-software-install-error-solution-2 (2)

Obd2tool.com engineer replied:

Please try to solve it by the following step-by-step operation.

Step 1: Press and release the power button to start the computer

Step 2: Press the blue ThinkVantage button [F12]

vcx-se-benz-with-all-vxdiag-software-install-error-solution-3 (2)

Step 3: Select [USB HDD] and press [Enter] button

vcx-se-benz-with-all-vxdiag-software-install-error-solution-4 (2)

Step 4: Select [Boot Win10x 64PE (2G above)]

vcx-se-benz-with-all-vxdiag-software-install-error-solution-5 (2)

Step 5: Open [BootFix] software

Select the BIOS (MBR Disk Boot Partition) and click “Yes”

vcx-se-benz-with-all-vxdiag-software-install-error-solution-6 (2)

Step 6: When repair successfully, it will show a success message.

vcx-se-benz-with-all-vxdiag-software-install-error-solution-7 (2)

If you have any VXDIAG VCX SE problem, please feel free to contact us.


http://avdicommander.com/2020/12/21/vcx-se-benz-with-all-vxdiag-software-installation-error-solution/


:: برچسب‌ها: VXDIAG VCX SE ,
:: بازدید از این مطلب : 102
|
امتیاز مطلب : 0
|
تعداد امتیازدهندگان : 0
|
مجموع امتیاز : 0
تاریخ انتشار : چهار شنبه 17 دی 1399 | نظرات ()
نوشته شده توسط : Likaibin

Here share a problem and solution about 2TB Hard Drive with all VXDIAG software cannot be installed on PC for VXDIAG VCX SE Benz DOIP.

Customer Problem:

I want to install all VXDIAG software HD on my Panasonic CF-19, but when I follow the prompt to select Mercedes-Benz operating system to start, I receive the error report “Windows failed to start. A recent hardware or software change might be the cause…” as shown in the pictures below.

vcx-se-benz-with-all-vxdiag-software-install-error-solution-1 (2)

vcx-se-benz-with-all-vxdiag-software-install-error-solution-2 (2)

Obd2tool.com engineer replied:

Please try to solve it by the following step-by-step operation.

Step 1: Press and release the power button to start the computer

Step 2: Press the blue ThinkVantage button [F12]

vcx-se-benz-with-all-vxdiag-software-install-error-solution-3 (2)

Step 3: Select [USB HDD] and press [Enter] button

vcx-se-benz-with-all-vxdiag-software-install-error-solution-4 (2)

Step 4: Select [Boot Win10x 64PE (2G above)]

vcx-se-benz-with-all-vxdiag-software-install-error-solution-5 (2)

Step 5: Open [BootFix] software

Select the BIOS (MBR Disk Boot Partition) and click “Yes”

vcx-se-benz-with-all-vxdiag-software-install-error-solution-6 (2)

Step 6: When repair successfully, it will show a success message.

vcx-se-benz-with-all-vxdiag-software-install-error-solution-7 (2)

If you have any VXDIAG VCX SE problem, please feel free to contact us.


http://avdicommander.com/2020/12/21/vcx-se-benz-with-all-vxdiag-software-installation-error-solution/


:: برچسب‌ها: VXDIAG VCX SE ,
:: بازدید از این مطلب : 105
|
امتیاز مطلب : 0
|
تعداد امتیازدهندگان : 0
|
مجموع امتیاز : 0
تاریخ انتشار : چهار شنبه 17 دی 1399 | نظرات ()
نوشته شده توسط : Likaibin

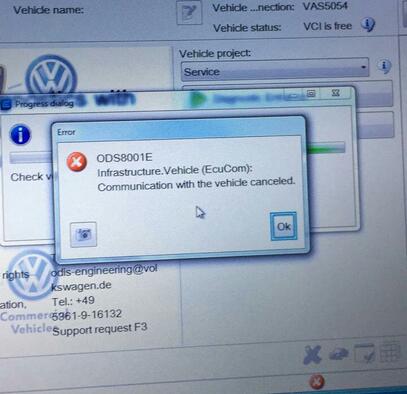
Some my blog read after installing ODIS Engineering software,when connect to car it prompt with ODS8001E error.But when they running ODIS diagnostic service program work fine,only ODIS-Engineering software occur ODS8001E error.So here i will show you the solution.

Related Contents:

Newest ODIS-E Engineering 12.1.1 & 9.0.4 Free Download

How to Install ODIS-Engineering 12.1.0 Diagnostic Software

Procedures:

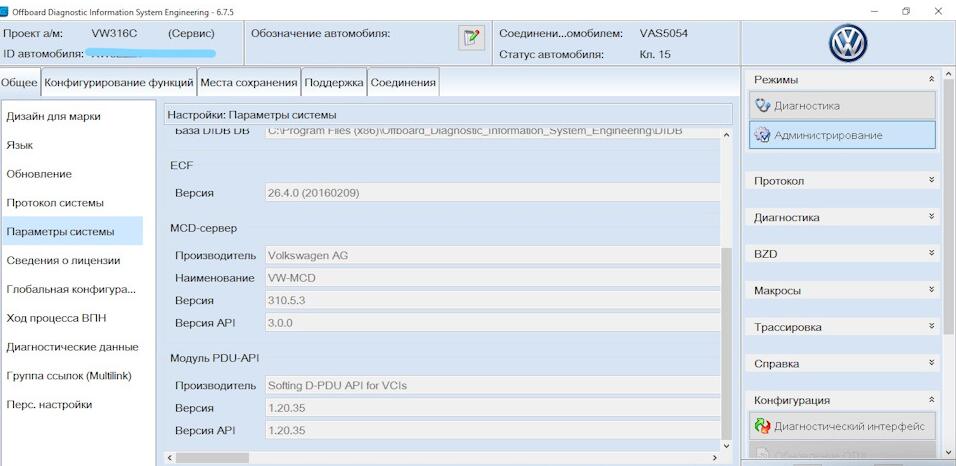
Run ODIS service software go to “System environment” to check which PDU-API version run here,in this example it is 1.20.035

Now we need edit pdu_api-root file in the path:C:\ProgramData\D-PDU API

We need <short_NAME> EDIC_D_PDU_API_OE </SHORT_NAME>
And then we edit the paths that indicate which version to use, in my case it looks like this:

<library_FILE URI=”file:/C:/Program Files (x86)/Softing/D-PDU API/1.20.035/vecom/PDUAPI_SoftingAG_1.20.035.dll”/>

<module_DESCRIPTION_FILE URI=”file:/C:/Program Files (x86)/Softing/D-PDU API/1.20.035/vecom/MDF_SoftingAG_EDIC-PDU-API_1.20.035.xml”/>

<cable_DESCRIPTION_FILE URI=”file:/C:/Program Files (x86)/Softing/D-PDU API/1.20.035/vecom/CDF_SoftingAG_EDIC-PDU-API_1.20.035.xml”/>

In this example replace it with 1.20.035

Then go to the folder C: \ ODIS-DIAG-MODULES- ENGIN \ MCD-SERVER \ VWMCD and edit the file MCD3D_SERVER.ini
find line MCD3D_MVCI_PDU_API_Shortname and rules it in this form:
# MCD3D_MVCI_PDU_API_Shortname = “D_PDU_API_DSA”
MCD3D_MVCI_PDU_API_Shortname = “EDIC_D_PDU_API_OE”

Now start ODIS E. If it doesn’t work right away, you can manually push the process)
To do this, go to ODIS E -> Configuration -> Diagnostic interface

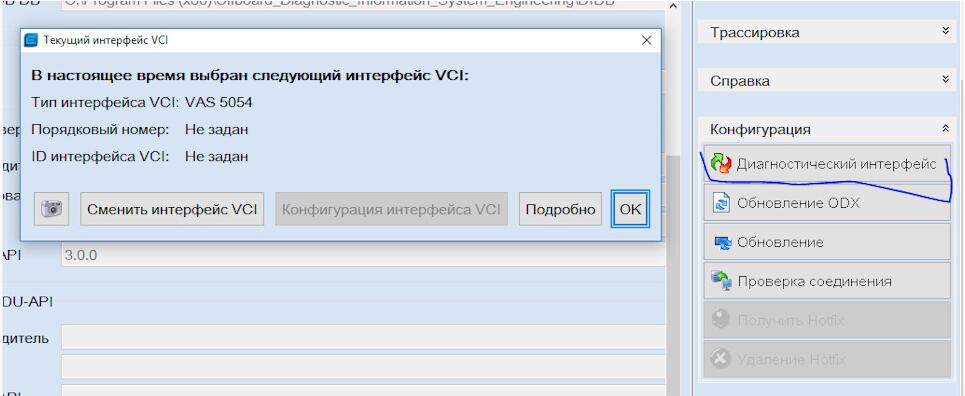
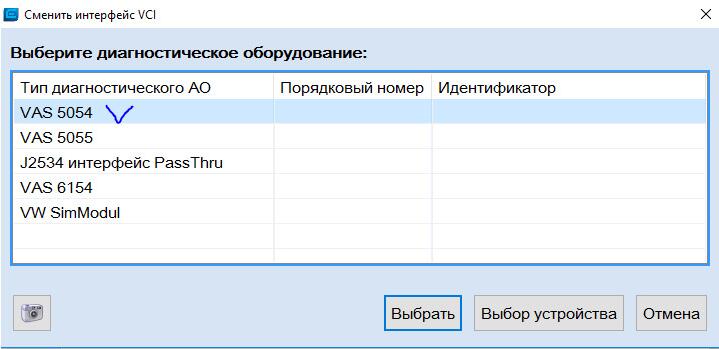
Click to change the VCI interface and select VAS5054

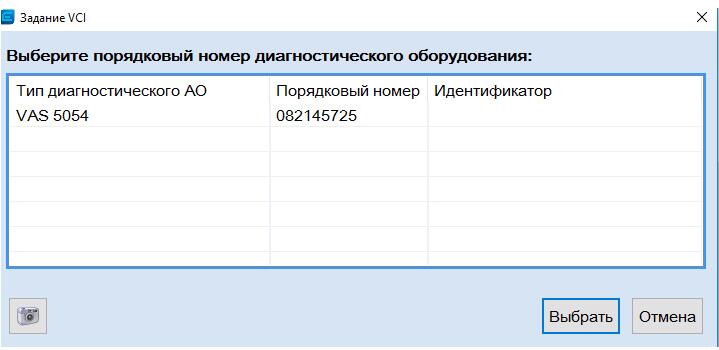
Our VAS with a serial number should appear in the list that opens, select it
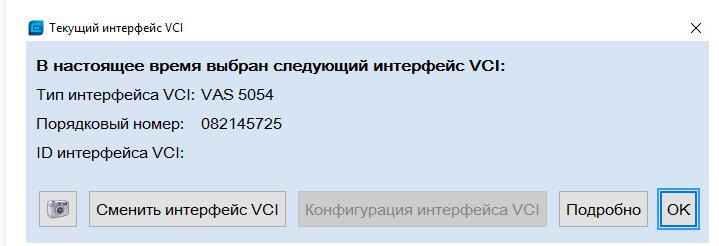
Click OK

Now in the system parameters we see the PDU-API version 1.20.035

Now you can definitely work! I use projects from ODIS Service, it automatically picks up VW316C


:: برچسب‌ها: ODIS Engineering software ,
:: بازدید از این مطلب : 143
|
امتیاز مطلب : 0
|
تعداد امتیازدهندگان : 0
|
مجموع امتیاز : 0
تاریخ انتشار : یک شنبه 7 دی 1399 | نظرات ()
نوشته شده توسط : Likaibin

A Volkswagen New Polo 2014 dashboard turned to system failure warning lights, system failures code “P106900 – collision cutoff has been triggered”. Here www.obd2tool.com will show you guide on how to use Launch X431 to repair/reset this trouble. And for more about Volkswagen repair,please check here:Volkswagen Trouble Repair.

What You need?
Launch X431 Device

Note:
1.Switch on the ignition;
2.Keep the battery voltage more than 12V;
3.X-431 should be performed in a good WiFi state, otherwise the diagnosis will be abnormal due to poor signal.

Operation Procedure
1.Select ShaiHai VW V21.61;
2.Select VW General System ;
3.Select system selection;
4.Select 44 Steering booster system

5.Perform [read fault code] display “P106900 – collision cutoff has been triggered”, and the next step will be carried out when the fault code cannot be cleared.

6.Security login,input password “20103”

7.Execute [system channel match], click the reset of all match values

8.Next, the reset status prompt of all the matching values is executed

9.After the success of the failure code, the power steering is restored to normal.
More test report about Launch X431 please check:Launch X431 Test report


:: برچسب‌ها: Launch X431 ,
:: بازدید از این مطلب : 96
|
امتیاز مطلب : 0
|
تعداد امتیازدهندگان : 0
|
مجموع امتیاز : 0
تاریخ انتشار : یک شنبه 7 دی 1399 | نظرات ()